
Zenario 9.5
 Introducing Staging Mode!
Staging mode on a page lets you make a draft and share it with colleagues before it's published.
This is a great feature if you want feedback on a new content item before you publish it, while showing it to people who are not Zenario administrators.
To use it, just make a draft of a content item — either an existing content item or a v1 draft.
How to use staging mode
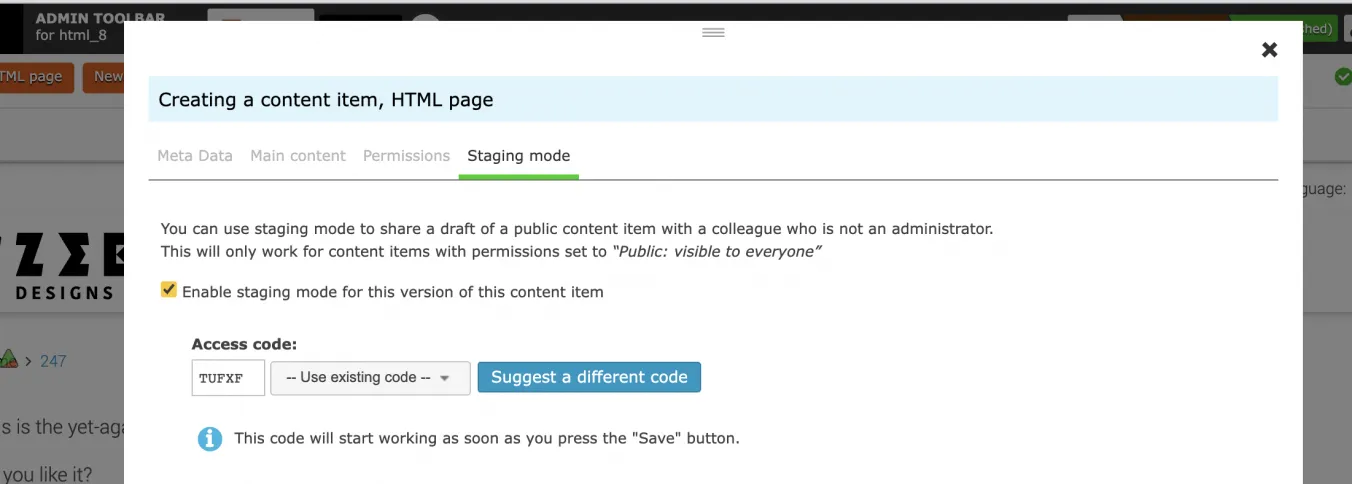
Open the meta data of the content item, and look for the "Staging mode" tab. You can click "Suggest" to let Zenario suggest a staging code (a 5-letter code), or choose one yourself. A staging code may look like this:
https://zenar.io/staging.php?id=html_123&code=ABCDE
This is the private code that you can send to your colleagues, who will be able to then view the draft. Here's how the screen looks:
Staging mode only works with content items that are public (not private, password-protected pages).
Once you save, you'll see the thumbs-up icon in the admin toolbar.

Copy the URL, which will include the Staging code, and send it to the people who you want to review the page. They will be able to access the page immediately.
Making a whole bunch of new pages?
That's fine. Go to each content item whose draft that you want to share, and just select "Use existing code". Then you can make a whole set of pages using the same code.
When you're done, simply publish the page (or delete the draft if it didn't work out). The staging code will be removed.
Improved search engine optimisation
This version of Zenario brings some SEO improvements via improved performance, achieved by reducing the site of print stylesheets (CSS):
- They are now included along with the normal skin styles as a single download, rather than two separate downloads. This reduces the number of http requests per page as well as the total download size.
- Zenario now includes a set of pre-written CSS rules as standard, that make most web pages look well-formatted when printed (whether to PDF or hard copy). They should look well-formatted even if the site has no specific print rules in the skin.
A print stylesheet is still formatted in a similar way to previous versions of Zenario, in the sense that a designer still needs to write the rules in the print.css file in the skin.
The print.css file will be inside the skin's editable CSS directory, which is in turn inside the zenario_custom/skins directory. For example, for the Zebra Designs skin (called zebra_designs), it will be in:
zenario_custom/skins/zebra_designs/editable_css/print.css
Minification of CSS
Zenario now minifies the skin CSS bundle file, to reduce the download time of CSS and thus improve SEO.
Easier admin login
It is now possible to log in to a Zenario site using admin/ (with a trailing slash), for example, zenariosite.com/admin/ .
Other new features
The admin toolbar now has a "hide" button that allows you to remove it from view and browse your site in preview mode.
We have made some updates on the WYSIWYG editors, so that full-featured editors now have a better layout, and minimal-featured ones (like for editing a content item's Summary field) now just have the essential buttons.
The Extranet Profile form now has the facility to allow a user to delete their account.
Forms now support client-side (Ajax-based) validation on text fields. So forms give feedback on any validation errors while the user is filling it it in.
The Advanced Search plugin now has the ability to search for locations.
When editing the categories of a content item, there is more information beside each category name to say if it's public or private, what its public name is, and how many content items use that category.
When viewing the properties of an image in the Image Library, it's now much easier to see the URL to use when linking to the image.
When closing Gridmaker after opening it from the front end, the "Show mobile and empty slots" option will now automatically be turned on without you needing to click it.
We have deleted the admin permission for viewing a layout's properties. Letting all administrators view information on a layout's size/columns/slots is not a security issue and didn't need a permission.
Other miscellaneous changes
Advanced Search plugin is now enabled on a new site by default.
You can no longer use images in the summary field of a content item.
When in Edit mode, Zenario now shows a grey triangle when there's a link to a hidden content, instead of orange covering both hidden and draft items.
When a newsletter is sent via scheduled sending, it's now possible for all site administrators to be sent a copy.
Scheduled publishing has had an update, with Zenario now sending an email to confirm when relevant scheduled publishing actions occur.
For the Promo Menu with Images plugin, the size of images is now controlled on the plugin rather than on the menu node itself.
It's now possible to associate a page or an area of a site with a promotional image. The meta data module's plugin can now show the promotional image of the menu node or of its parents.
On the Users/Contacts dataset, the linked countries field has been improved and it's now possible to edit certain options. It can also now be exported.
We've changed our terminology in relation to content items from "orphaned" to "not in menu".
Security-related changes
Version 9.5 of Zenario contains an internal rewrite to how plugins function when they are displayed. This should improve the security and fix vulnerabilities in a few rare and specific cases.
Whenever an administrator saves content in a WYSIWYG Editor, Zenario now runs the submitted content through a HTML sanitiser.
When making an anchor link from a banner, a controlled list of characters is now applied, so that anchor links cannot contain spaces or certain special characters. This is for security, to help prevent XSS attacks.
We've improved security around email templates. It is no longer possible to include certain fields in email templates, e.g. fields that might include data from the users table may not be included.
We have removed the "Domain redirects" feature. This feature used to let you redirect an entire domain to a content item without needing to edit your Apache virtual hosts file. However doing this without actually needing to edit the Apache virtual hosts file was only possible if a domain was using HTTP and not HTTPS, so the feature had become obsolete in a HTTPS-everywhere world.
When we generate an Excel spreadsheet, Zenario now uses the PHPSpreadsheet library. This now replaces the older PHPExcel library.
Bug fixes
If someone tries to access and browse the site using the cookie-free domain, we now redirect them to the actual domain.
The "Repair public images" now repairs not just images at full size but images that have been resized in a WYSIWYG area.
We fixed a bug when trying to export a list of spare aliases used on a site from Organizer.
On forms, consent fields are now mandatory by default, when added to a form.
Important changes for people hosting Zenario
Important: hosting providers, you will need to delete the old dummy admin/ directory
If you have previously downloaded Zenario, you may have a dummy admin/ directory in your CMS root directory to redirect admins to the actual admin login.
This is now down by the .htaccess file, and this dummy directory can cause conflicts or redirect loops if it is allowed to stay in the filesystem, so we recommend you delete it.
Important: designers, you will need to change your CSS!
If you are using a print.css file, you will now need a media query around your print rules, e.g. like this:
@media print {
    /* Your print rules here */
}
If you are upgrading from an earlier version of Zenario prior to 9.5, you will need to modify the print.css file to add the line shown above.
Browser-specific styles?
If you are using browser specific files (e.g. style_ff.css or style_webkit.css), there are some additional changes needed. You will need to edit each rule to include a browser-specific prefix, e.g. like this:
body.webkit p {
    /* Your browser-specific styles here */
}
The full list of prefixes used for each browser are as follows:
| Browser-specific file | Prefix needed |
|---|---|
| style_chrome.css | body.chrome |
| style_edge.css | body.edge |
| style_ff.css | body.ff |
| style_ios.css | body.ios |
| style_ipad.css | body.ipad |
| style_iphone.css | body.iphone |
| style_opera.css | body.opera |
| style_safari.css | body.safari |
| style_webkit.css | body.webkit |
Developers: check your JS libraries
If you were using the requireJSLib() and requireJSLibsForFEAs() in your plugins, these function were previously called statically.
In Zenario version 9.5 we now need to track what libraries your plugin requests, as part of our improvements to our page caching system. This means that you will now need to call them as methods, e.g.:
$this->requireJSLib(...);
or:
$this->requireJSLibsForFEAs();
You will need to change this when you update to 9.5 to avoid a PHP error.