Meta data about the skin - description.yaml file
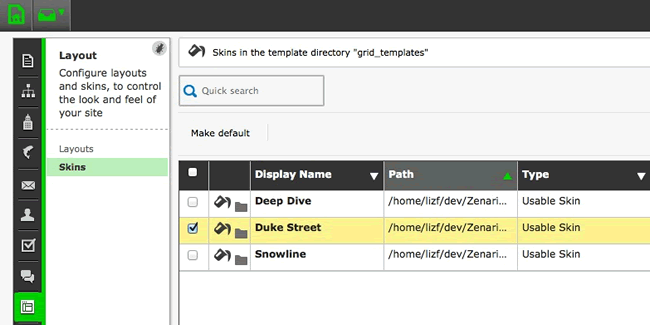
Adding a description.yaml file is highly recommended. This file contains descriptive information about the skin. Here are some examples on how having this file improves the interaction of the skin with Zenario.
- You will be able to give a display name for the skin and then an Administrator can easily identify it.
display_name: Duke Street

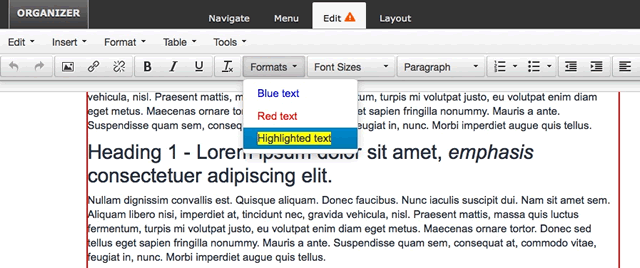
- You will be able to define style formats which are class names that can be selected in the WYSIWYG Editor under the "Formats" menu.
style_formats:
    -
        title: "Blue text"
        selector: "*"
        classes: "blue_text"
    -
        title: "Red text"
        selector: "*"
        classes: "red_text"
    -
        title: "Highlighted text"
        selector: "*"
        classes: "highlighted_text"

- If you add styles for a plugin you may want to define pickable class names. When adding a plugin you will see a list that lets you choose a class for it.
pickable_css_class_names:
    plugins:
        -
            module_css_class_name: zenario_banner
            css_class_name: banner_with_image_floated_left
            label: Float image left
        -
            module_css_class_name: zenario_banner
            css_class_name: banner_masthead
            label: Masthead

Format of the description.yaml file
Below is an example of this file with correct formatting. There are some comments to explain what each element does.
You can copy this code and edit it. You must use a tab-size of 4 spaces.
# You must use a tab-size of 4 spaces to edit this file.
#
# This file contains descriptive information about this Skin.
---
# A display name for this Skin in Admin mode.
# Defaults to the directory name if not specified.
display_name: Duke Street

# This tag should be set to "component" or "usable".
# Usable Skins are selectable in the Admin interface. Component Skins can be
# extendable by other Skins, but can't be used on their own.
# Defaults to usable if not set.
type: usable

# You can enter the directory name of a Skin in
# this tag to extend that Skin.
#
# When extending a Skin, your Skin will inherit all of its css files.
# These css files from an inherited Skin will always be included before
# the css files in the current Skin, which allows you to customise or
# overwrite any rules from the inherited Skin.
#
# It will also inherit anything in that Skin's description, with properties
# merging together using TUIX-like logic.
extension_of_skin: ''

# A CSS class name or names. These will be added to a <div> that wraps the page.
# This might allow you to write rules in a component Skin that target specific
# Skins that extend it; for example your component Skin may wish to have rules
# that only apply to a right-to-left Skin.
css_class: ''

# Style formats are class names that can be selected in the WYSIWYG Editor
# under the Formats menu.
#
# See http://www.tinymce.com/wiki.php/Configuration%3aformats for a specification,
# and http://www.tinymce.com/tryit/custom_formats.php for an example.
#
# If another Skin extends this Skin, then it will also inherit this list.
# If you don't include this tag then the Styles menu won't appear.
style_formats:
    -
        title: "Code"
        selector: "*"
        classes: "code"
    -
        title: "Uppercase letters"
        selector: "*"
        styles:
            text-transform: uppercase
    -
        title: "Capitalize letters"
        selector: "*"
        styles:
            text-transform: capitalize
    -
        title: "Lowercase letters"
        selector: "*"
        styles:
            text-transform: lowercase
    -
        title: "Normal letters"
        selector: "*"
        styles:
            text-transform: ''
    -
        title: "Faint"
        inline: 'span'
        styles:
            opacity: 0.5

# Pickable class names are class names that can be selected in certain places.
# In this case, where they have a Banner, an Admin will see a list
# that lets him choose e.g. the banner_with_image_floated_left class name to it.
# You can also have pickable class names for other Plugins,
# for Content Items, Layouts and Menu Nodes.
# If another Skin extends this Skin, then it will also inherit this list.
pickable_css_class_names:
    plugins:
        -
            module_css_class_name: zenario_banner
            css_class_name: banner_with_image_floated_left
            label: Float image left
        -
            module_css_class_name: zenario_banner
            css_class_name: banner_masthead
            label: Masthead
        -
            module_css_class_name: zenario_content_list
            css_class_name: content_list_news
            label: News listing
        -
            module_css_class_name: zenario_content_list
            css_class_name: content_list_blog
            label: Blog entries listing
        -
            module_css_class_name: zenario_plugin_nest
            css_class_name: nest_tabbed
            label: Tabbed content

