Extending a skin
Zenario comes with a default skin as standard which has a simple, clean look. Should you want to change this look it is possible to extend the skin using the method below.
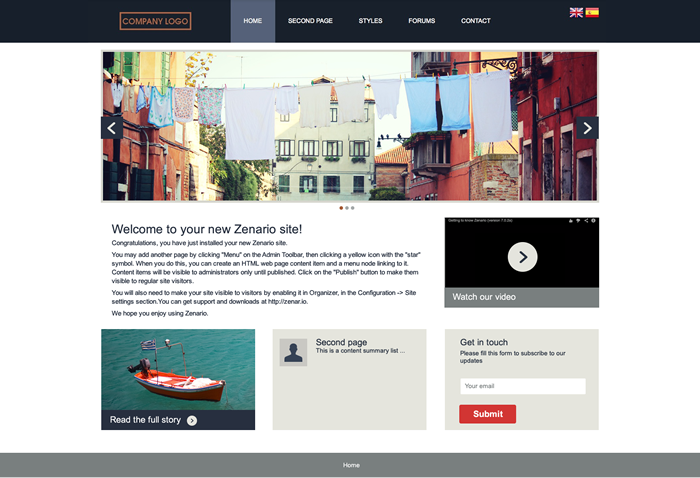
Let's take the default skin "Duke Street" as an example.
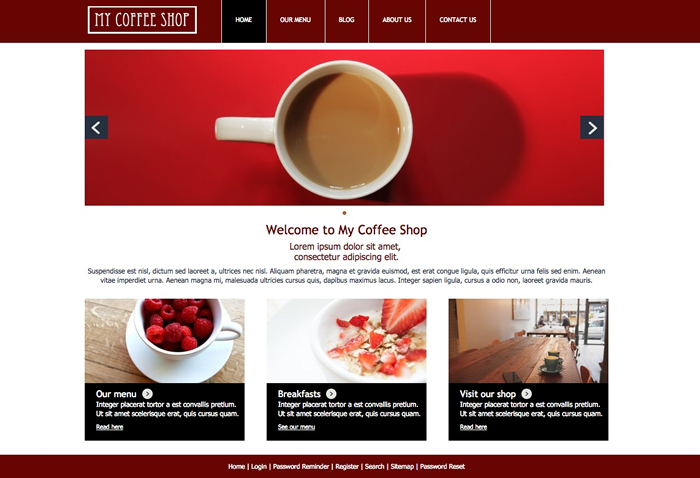
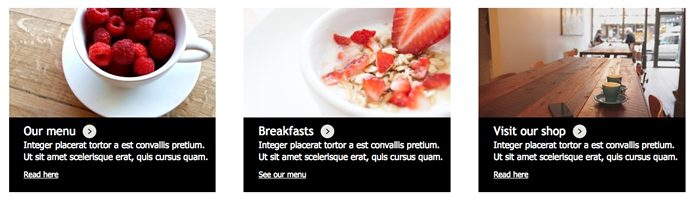
With just a few changes you can accomplish a different look and feel to reflect your companies corporate colours. The image below shows the extended "My Coffee Shop" skin.
Creating a new Skin
For this example we are going to create a new skin folder called "my_coffee_shop".
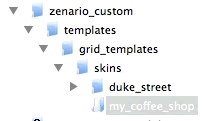
zenario_custom/templates/grid_templates/skins/
In the new folder, you need to create two new files:
description.yaml
stylesheet.css (optional name)
description.yaml file
This description file is sort, with only a few definitions needed.
Define the new skin's display name:
display_name: My Coffee Shop
Then define the directory name of the skin to extend using the "extension_of_skin" tag.
extension_of_skin: 'duke_street'
The new skin will inherit all of the "Duke Street" css files, style formats and pickable css classes. If an additional style format is needed then set it out like this:
style_formats:
    -
        title: "Corporate red text"
        selector: "p"
        classes: "text_red"
Pickable css classes follow the same rule. Plugin classes can also be defined here.
pickable_css_class_names:
    plugins:
        -
            module_css_class_name: zenario_content_list
            css_class_name: food_list_nutrition_facts
            label: Food Nutritional Value
Your final description.yaml should look similar to this:
display_name: My Coffee Shop
type: usable
extension_of_skin: 'duke_street'

style_formats:
    -
        title: "Corporate red text"
        selector: "p"
        classes: "text_red"

pickable_css_class_names:
    plugins:
        -
            module_css_class_name: zenario_content_list
            css_class_name: food_list_nutrition_facts
            label: Food Nutritional Value
Note: For more information about the content of the skin description.yaml file, click here.
stylesheet.css
The stylesheet.css is where you can customise any rules inherited from the default "Duke Street" skin. This type of file does not have a mandatory name associated with it.
In order to extend the "Duke Street" skin to look like the "My Coffee Shop" skin, there are 10 css rules that were changed.
1. "Duke Street" has a dark blue and purple header and menu as standard but for "My Coffee Shop" the following needed to be changed:
- The header and footer background colours.
- The font of the menu text.
- The background colour of the current page menu node.
- The menu nodes to have a white border.
Duke street

My Coffee Shop

The following styles were added:
.Grid_Header,
.Grid_Footer {
    background:#660502;
}

.zenario_promo_menu ul li {
    font-family:"Trebuchet MS", Helvetica, sans-serif;
    border-right:1px solid #FFF;
}

.zenario_promo_menu ul:first-child li {
    border-left:1px solid #FFF;
}

.zenario_promo_menu__default_style ul li.level1_on a {
    background:#000;
}
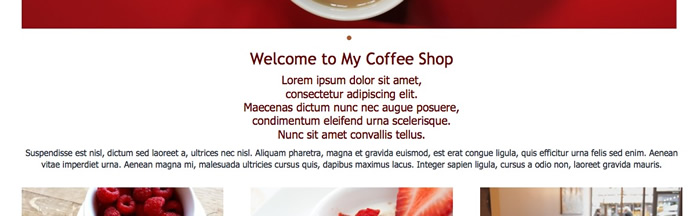
2. For the content a different font style is used. The headings have the red corporate colour, and a class was set up so any text used on the website is red.
The following styles were used to do this:
.zenario_skin {
 font-family:Tahoma, Geneva, sans-serif;
}
.zenario_skin h1,
.zenario_skin h2,
.zenario_skin h3,
.zenario_skin h4,
.zenario_skin h5,
.zenario_skin h6 {
 font-family:"Trebuchet MS", Helvetica, sans-serif;
 color:#660502;
}

.zenario_skin p.text_red {
 color:#660502;
}
3. For the banners a black background was needed.
So to accomplish this, the following styles can be used:
.zenario_banner__default_style > div {
 background:#000;
}
Once complete the full stylesheet.css file looks like this:
.Grid_Header,
.Grid_Footer {
 background:#660502;
}

.zenario_skin {
 font-family:Tahoma, Geneva, sans-serif;
}

.zenario_skin h1,
.zenario_skin h2,
.zenario_skin h3,
.zenario_skin h4,
.zenario_skin h5,
.zenario_skin h6 {
 font-family:"Trebuchet MS", Helvetica, sans-serif;
 color:#660502;
}

.zenario_promo_menu ul li {
 font-family:"Trebuchet MS", Helvetica, sans-serif;
 border-right:1px solid #FFF;
}

.zenario_promo_menu ul:first-child li {
 border-left:1px solid #FFF;
}

.zenario_promo_menu__default_style ul li.level1_on a {
 background:#000;
}

.zenario_banner__default_style > div {
 background:#000;
}

.zenario_skin p.text_red {
 color:#660502;
}
Using the new Skin in a Layout
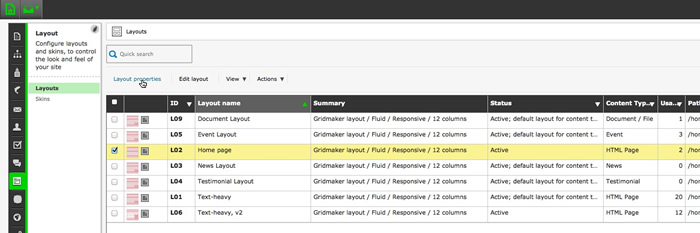
The new skin is now ready to be used. Go to Organizer > Layouts and choose the layout to change the skin.
Click "Layout properties".
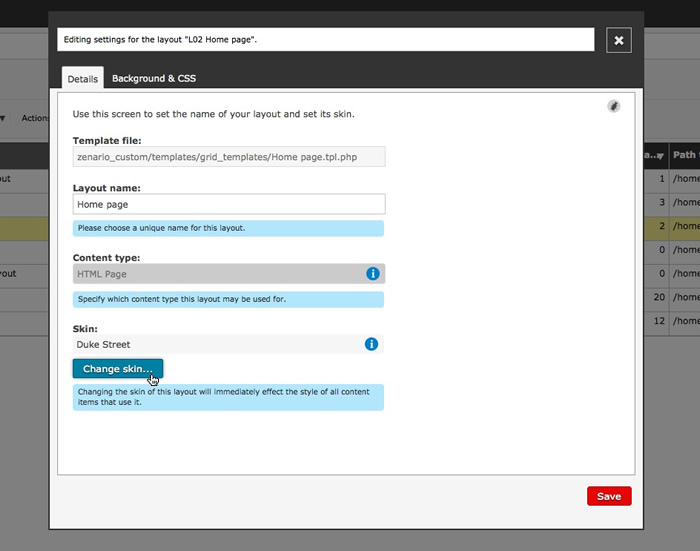
In the "Details" tab, choose a skin by clicking the "Change skin..." button.
Choose the new skin. And click the "Choose this skin" button.
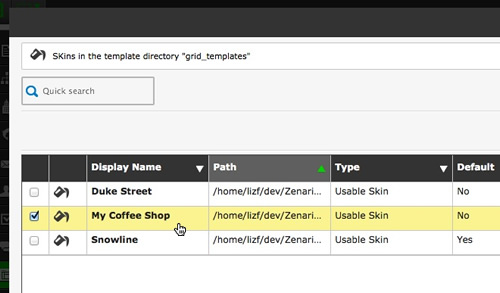
Repeat the steps described above to set the new skin to other layouts on your website.